Friday, June 3, 2011

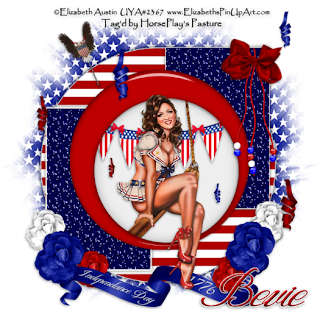
The Independant Way


Supplies

1 tube of choice - I used the artwork of Elizabeth Austin which can be purchased at Up Your Art. You must have a license to use.

Font of choice - I used Shit Happens here and Vivaldi which came with my pc

Weescotlass Mask 241 here

Eyecandy 3.1 - Glow

“Old Libery” is a tagger size scrap kit created by Pixie of KissedbyPix Design and can be purchased from her store TKO Scraps. You can visit her blog here.

This tutorial was written assuming you have a working knowledge of PSP.

~♥~ Let’s get started ~♥~

Open a 700 x 700 blank canvas.
Flood fill white.

Copy and paste Patriotic Glass Frame Red as a new layer.
Resize 90%
Use your Magic Wand and click inside the frame.
Selections/Modify/Expand by 4.
New Raster layer below the frame.
Flood fill with #efefef
Copy and paste Patriotic Swag 2 as a new layer below the frame.
Resize 70%
Selections/Invert
Tap the delete key.
Deselect.

Copy and paste your tube as a new layer.

Make your Selections Tool active set on Rectangle.
Make a rectangle approximately 225 x 350 pixels.
New Raster layer.
Copy and paste Glitter Paper 1 Into Selection.
Deselect.
Apply Eyecandy 3.1 - Glow:
Width: 3
Opacity: 100
Opacity Dropoff: Fat
Color: White
OK

Duplicate
Move both rectangles into position - see my tag for reference.

Make your Selection Tool active again set on Circle.
Place your curser in the center of your canvas and pull outward until you have a circle that’s barely outside the rectangles.
New Raster layer.
Copy and paste Stripes Paper Into Selection.
Deselect.
Apply the same Glow effect.

Copy and paste Banner Blue as a new layer.
Color Pallet:
Foreground and Background set to white.
Using the Shit Happens font type out the words “Independence Day”.
Convert to Raster layer.
Use your Pick Tool to angle it over the left side of the banner.
Tip: If you can’t get the angle exact then Free Rotate by 1 degrees until it’s angled the way you want.

Change the font to Vivaldi and type out “1776”.
Move it into position over the right side.
Merge Visible the word layers.
Give them a drop shadow.
Merge down.
Words and ribbon should be one layer.
Resize 70%

Copy and paste Stick Pin 6 as a new layer.
Resize 40%
Mirror
Free rotate Right 25 degrees.
Position over the striped circle layer and erase the bottom half of the pin.
Highlight the striped paper.
Make your Lighten/Darken Brush active
Size 6
Darken the striped paper at the end of the stick pin to give the effect it’s stuck in there.

Add your embellishments. I used:
Bow Red: Resize 25% and 80%/Free rotate Right 10 degrees
Bead String 1: Resize 60%
Silk Flower Blue: Resize 25%
Silk Flower Red: Resize 25% and 70%
Silk Flower White: Resize 25% and 70%
Curly Blue and Red: Resize 25%/Duplicate as many times as you like/Resizing as you like.

Highlight your white canvas.
New Raster layer.
Select All.
Copy and paste Starz Paper Into Selection.
Deselect.
Apply the mask.
Merge Group.

Add your copyrights.

Add your name.
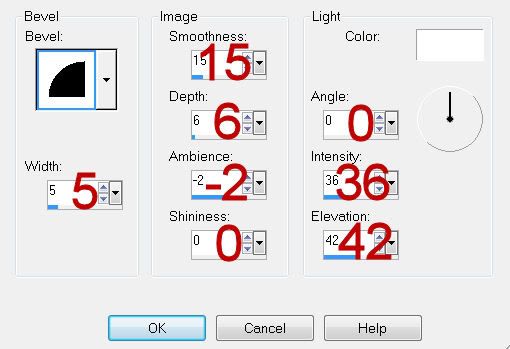
Give it a slight Inner Bevel:

Apply the same Glow Effect.

Resize all layers 80%.

I hope you enjoyed this tutorial.
I’d love to see your results and show it off in my gallery.
Email me!
Hugs,
Bev

Thursday, June 2, 2011

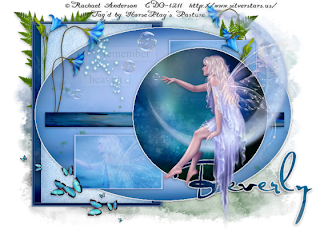
Remember Heaven


Supplies

1 tube of choice - I used the artwork of Rachel Anderson which can be purchased from CDO. You must have a license to use.

Font of choice - I used Al Sandra here

Becky Mask 22 here

Divine Intentionz template 268 here

Eyecandy 3.1 - Glow

Greg’s Factory Output Vol. II - Pool Shadow

“Blue Bubbly World” is a tagger size scrap kit created by Stef of Stef’s Scrap Kits and can be purchased from Lollipops n Gumdrops. You can visit her blog here.

This tutorial was written assuming you have a working knowledge of PSP.

~♥~ Let’s get started ~♥~

Open up the template.
Shift + D.
Close out the original.
Delete the top 2 layers.
Image/Canvas Size:
700 x 500
OK
Open up the background layer and flood fill white.

Highlight Square Shape layer.
Click on it with your Magic Wand.
New Raster layer.
Copy and paste Paper 7 Into Selection.
Deselect.
Delete the template layer.

Highlight Glittered Square Shape layer.
Click anywhere outside of it with your Magic Wand.
Selections/Invert
New Raster layer.
Copy and paste Paper 1 Into Selection.
Adjust/Add Remove Noise/Add Noise:
Gaussian and Monochrome checked
Noise: 15%
OK
Deselect.
Delete the template layer.

Highlight Oval Half 2 layer.
Merge down.
Both oval halves should be on one layer.
Use your Magic Wand and click on the blue side.
Use your Magic Wand and click on the pink side.
The ants should be all one big oval.
New Raster layer.
Copy and paste Paper 12 Into Selection.
Deselect.
Delete the template layer.
Apply Eyecandy 3.1 - Glow:
Width: 3
Opacity: 100
Opacity Dropoff: Fat
Color: White
OK

Highlight Thin Rectangle 2 layer.
Merge Down.
Both rectangle layers should be on one layer.
Use your Magic Wand and click on the pink side.
Use your Magic Wand and click on the blue side.
The marching ants should now be one thin rectangle.
New Raster layer.
Copy and paste Paper 6 Into Selection.
Deselect.

Delete the template layer.
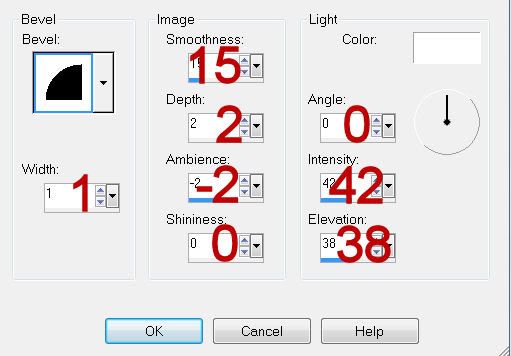
Give it a slight Inner Bevel:


Highlight Rectangle 1 layer.
Click on it with your Magic Wand.
New Raster layer.
Copy and paste Paper 13 Into Selection.
Copy and paste your tube as a new layer above the paper.
Move into position.
Selections/Invert
Tap the delete key.
Deselect.
Delete the template layer.
Change the Properties of the tube layer to Soft Light.

Highlight Rectangle 2 layer.
Click on it with your Magic Wand.
New Raster layer.
Copy and paste Paper 13 Into Selection.
Deselect.
Delete the template layer.

Highlight Circle template layer.
Click on it with your Magic Wand.
New Raster layer.
Copy and paste Paper 9 Into Selection.
Apply Greg’s Factory Output Vol. II - Pool Shadow:
Use Default Settings accept lower the Intensity bar to about 67.

Copy and paste your tube as a new layer.

Add your embellishments. I used:
2: Resize 40%/Duplicate/Duplicate/Mirror
4: Resize 30%/Duplicate/Mirror
3: Resize 40%/Duplicate/Mirror
8: Resize 40%
51: Each word - Remember & Heaven: Resize 40%/Lower the Opacity to about 6
35: Resize 25% and 25%/Duplicate/Resize 70%/Duplicate/Resize 70%/Duplicate/Resize 70%

Highlight your white canvas.
New Raster layer.
Select All.
Copy and paste Paper 10 Into Selection.
Deselect.
Apply the mask.
Merge Group.

Add your copyrights.

Add your name.
Give it a glow.

Resize all layers 80%.

I hope you enjoyed this tutorial.
I’d love to see your results and show it off in my gallery.
Email me!
Hugs,
Bev
Wednesday, June 1, 2011

Cold Brew and My Pole


Supplies

1 tube of choice - I used the artwork of Steve Walker which can be found at MPT. You must have a license to use.

Font of choice - I used Inspiration. I’m sorry, I couldn’t find a link for this font. If you should have one can you please share so I can link it up for others? Thanks so much!

My Mask 22 here

“Happy Father‘s Day” is a tagger size scrap kit created by me, HorsePlay’s Pasture Designs and can be purchased from either of my stores here or here. You can visit my designer blog here.

This tutorial was written assuming you have a working knowledge of PSP.

~♥~ Let’s get started ~♥~

Open a 700 x 700 blank canvas.
Flood fill white.

Copy and paste 53 as a new layer.
Resize 85%
Free rotate Left 7 degrees
Use your Magic Wand and click inside each frame.
Selections/Modify/Expand by 4.
New Raster layer below the frame.
Copy and paste Paper 14 Into Selection.
Copy and paste 30 as a new layer below the frame.
Position to one side.
Duplicate/Move to other side.
Highlight the paper layer.
Use your Magic Wand and click anywhere outside of the paper.
Highlight each tree layer and tap the delete key.
Deselect.

Copy and paste your tube as a new layer.

Add your embellishments. I used:
1: Resize 25% and 70%
25: Resize 70%/Free rotate Right 65 degrees
41: Resize 40%
8: Resize 25%
29: Duplicate
28: Resize 50%
26: Resize 65%/Mirror
27: Resize 70%/Mirror
7: Resize 25% and 80%

Highlight your white canvas.
New Raster layer.
Select All.
Copy and paste Paper 15 Into Selection.
Deselect.
Apply the mask.
Merge Group.

Add your copyrights.

Add your name.
Give it a slight Inner Bevel:


Resize all layers 80%.

I hope you enjoyed this tutorial.
I’d love to see your results and show it off in my gallery.
Email me!
Hugs,
Bev

Tuesday, May 31, 2011

Let's Play


Supplies

Font of choice - I used Childish Alpha here

Weescotlass Mask 220 here

Eyecandy 3.1 - Glow

“Let‘s Play” is a tagger size scrap kit created by Mar of Scrappin Mar and can be purchased from Lollipops n Gumdrops. You can visit her blog here. Thank you Jen for such an awesome kit!

This tutorial was written assuming you have a working knowledge of PSP.

~♥~ Let’s get started ~♥~

Open a 700 x 700 blank canvas.
Flood fill white.

Copy and paste 47 as a new layer.
Resize 25% and 60%
Use your Magic Wand and click inside each frame.
Selections/Modify/Expand by 4.
New Raster layer below the frame.
Copy and paste Paper 8 Into Selection.
Deselect.

Close out your white background.
Merge Visible.
Reopen your white background.

Make you Selection Tool active set on circle.
Hold your mouse at the center of the canvas and pull outward until the circle is just at the edges of the merged frame.
New Raster layer.
Copy and paste Paper 5 Into Selection.
Deselect.
Apply Eyecandy 3.1 - Glow:
Width: 3
Opacity: 100
Opacity Dropoff: Fat
Color: white
OK

Copy and paste Paper 6 as a new layer.
Resize 25% and 30%
Free rotate Left 10 degrees.
Apply the same Glow effect.
Move into position behind the circle layer - see my tag for reference.

Add your embellishments. I used:
1 (the words Let‘s Play): Resize 25% and 60%/Free rotate Left 10 degrees
4: Resize 25% and 55% and 90%
7: Resize 25% and 55% and 90%
21: Resize 25% and 50%/Free rotate Right 10 degrees
50: Resize 25% and 25%/Free rotate Left 70 degrees
51: Resize 25% and 25% and 70%
54: 25% and 25%
56: Resize 25% and 25%
57: Resize 25% and 25%
58: Resize 25% and 25%
11: Resize 25% and 60%
10: Resize 25% and 70%

Highlight your white canvas.
New Raster layer.
Select All.
Copy and paste Paper 9 Into Selection.
Deselect.
Apply the mask.
Move it up on your canvas a bit if you have to.
Merge Group.

Add your copyrights.

Add your name.
Color Pallet:
Foreground and background both set to Grey color.
Type out your name.
Convert to Raster layer.
Use your Magic Wand and click on each letter.
New Raster layer.
Copy and paste Paper 5 Into Selection.
Deselect.
Delete your name that’s in gray.
Apply the Glow effect.

Resize all layers 80%.

I hope you enjoyed this tutorial.
I’d love to see your results and show it off in my gallery.
Email me!
Hugs,
Bev
Hidden Heartbreak


Supplies

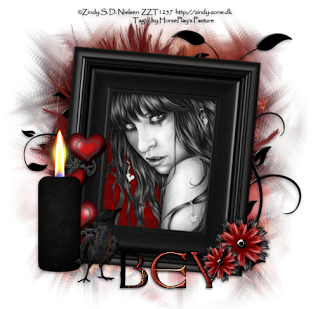
1 tube of choice - I used the artwork of Zindy S.D. Nielsen here

Font of choice - I used Anglo Saxon here

Weescotlass Mask 149 here

Greg’s Factory Output Vol. II - Pool Shadow

“Shot Through the Heart” is a tagger size scrap kit created by Jen of Sleek n Sassy Designz and can be purchased from Lollipops n Gumdrops. You can visit her blog here. Thank you Jen for such an awesome kit!

This tutorial was written assuming you have a working knowledge of PSP.

~♥~ Let’s get started ~♥~

Open a 700 x 700 blank canvas.
Flood fill white.

Copy and paste Frame 4 as a new layer.
Resize 75%
Free rotate Right 5 degrees
Use your Magic Wand and click inside the frame.
Selections/Modify/Expand by 4.
New Raster layer below the frame.
Copy and paste Paper 7 Into Selection.
Copy and paste your tube as a new layer above the paper.
Selections/Invert
Tap the delete key.
Deselect.

Copy and paste Crow as a new layer.
Resize 40%
Use your Magic Wand and click anywhere outside of the bird.
Selections/Invert
Apply Greg’s Factory Output Vol. II - Pool Shadow:
Use Default Settings.
OK
Deselect.

Add your embellishments. I used:
Flower: Resize 30%/Duplicate/Resize 70%
Steampunk 4: Resize 50%
Candle: Resize 50%
Feather
Doodle: Resize 80%/Duplicate/Resize 70%

Crop your image.

Highlight your white canvas.
New Raster layer.
Select All.
Copy and paste Paper 2 Into Selection.
Deselect.
Apply the mask.
Resize 110%
Merge Group.

Add your copyrights.

Add your name.
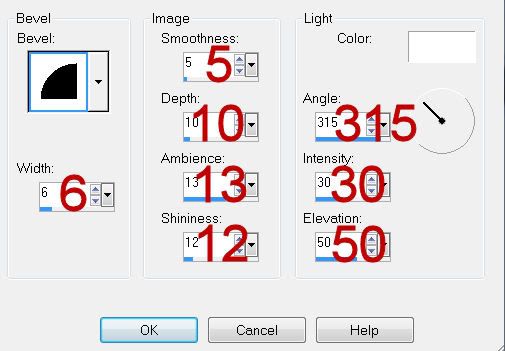
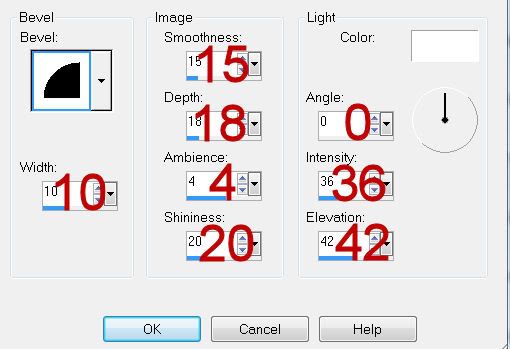
Give it a slight Inner Bevel:


Effects/Edge Effect/Enhance More

Resize all layers 80%.

I hope you enjoyed this tutorial.
I’d love to see your results and show it off in my gallery.
Email me!
Hugs,
Bev

Sunday, May 29, 2011

Biker's Summer


Supplies

Font of choice - I used Aquarelle here

Becky mask 22 here

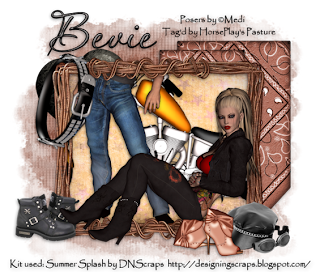
“Summer Splash ” is a tagger size scrap kit created by Conchi of DNScraps and can be purchased from Lollipops n Gumdrops. You can visit her blog here. Thank you Conchi for a super summer kit!

This tutorial was written assuming you have a working knowledge of PSP.

~♥~ Let’s get started ~♥~

Open a 700 x 700 blank canvas.
Flood fill white.

Copy and paste Wire Frame as a new layer.
Resize 55%
Free rotate Left 90 degrees.
Use your Freehand Selection Tool to outline the frame - keeping the marching ants at the center of the frame sides.
New Raster layer below the frame.
Copy and paste Paper 24 Into Selection.
Copy and paste Motobike as a new layer above the paper.
Move into position.
Selections/Invert
Tap the delete key.
Copy and paste Biker Dude 3 as a new layer.
Resize 65%
Move into position.
Tap the delete key.
Deselect.

Copy and paste Biker Babe 2 as anew layer.
Resize 60%.
Position in front of the frame.

Add your embellishments. I used:
Bandana 2: Resize 60%/Duplicate/Resize 70%
Hearts 2: Resize 25%/Mirror
Bracelet: Resize 30%/Free rotate Left 75 degrees
Girl Gear: Resize 25%
Boots: Resize 25% and 70%
Boots 3: Resize 25% and 50%/Duplicate/Free rotate Left 90 degrees

Crop your image.

Highlight your white canvas.
New Raster layer.
Select All.
Copy and paste Paper 8 Into Selection.
Deselect.
Apply the mask.
Merge Group.

Add your copyrights.

Add your name.
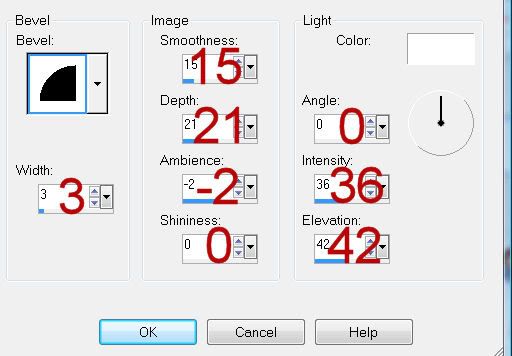
Give it a slight Inner Bevel:


Resize all layers 90%.

I hope you enjoyed this tutorial.
I’d love to see your results and show it off in my gallery.
Email me!
Hugs,
Bev