

Supplies
1 tube of choice - I used the wonderful artwork of Camilla Drakenborg which can be purchased from Up Your Art. You must have a license to use.
Vix Mask 452 here
My template 161 here
Plug Ins used:
Mura's Meister - Copies
"Flowers, Jewels, and Souvenirs" is a tagger size scrap kit )also available in Full Size) created by Disyas Digital Designs and can be purchased from Scraps From the Heart. You can visit her blog here.
This tutorial assumes you have a working knowledge of PSP.
~♥~ Let's get started ~♥~
Open up the template.
Shift + D.
Close out the original.
Image/Canvas Size:
700 x 700
OK
Highlight the Background layer.
Flood fill white.
Delete the top 4 layers.
Highlight Raster 2 layer.
Merge Down.
Click on each rectangle with your Magic Wand.
New Raster layer.
Copy and paste Paper 4 Into Selection.
Deselect.
Delete the template layer.
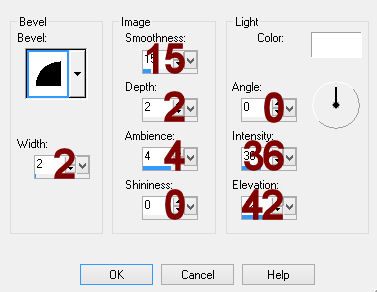
Give the paper layer a slight Inner Bevel:
Highlight Raster 3 layer.
Click on it with your Magic Wand.
New Raster layer.
Open up Paper 8.
Use your Selection Tool set on Rectangle and section out the center of the paper.
Make your working canvas active.
Copy and Paste Into Selection.
Deselect.
Repeat the above step with Raster 5 layer.
Highlight Raster 4 layer.
Click on it with your Magic Wand.
New Raster layer.
Copy and paste Paper 13 Into Selection.
Deselect.
Delete the template layer.
Give it the same slight Inner Bevel.
Repeat the above step with Raster 7.
Highlight Raster 7 layer.
Click on it with your Magic Wand.
New Raster layer.
Copy and paste Paper 1 Into Selection.
Deselect.
Delete the template layer.
Give it the same slight Inner Bevel.
Copy and paste E65 as a new layer.
Resize 10%
Apply Mura's Meister - Copies:
Choose Encircle.
Use Default Settings accept change the top 3 number as follows:
Number: 40
Shift X: 60
Shift Y: 60
OK
Move the ring into position over the large round paper.
Duplicate
Resize 80%
Move into position over the small circle.
Copy and paste your tube as a new layer.
Add the rest of your elements. I used:
E 26
E3: Resize 8%/Duplicate 3x's
E42: Resize 12%/Duplicate 2x's
E58: Resize 60%/Duplicate
E30: Resize 20%/Free rotate Left 25 degrees/Duplicate/Mirror/Resize 70%
E27: Resize 50%
E5: Resize 25%/Duplicate/Mirror/Resize 70%
E28: Resize 60%/Duplicate/Resize 70%/To both element layers, Duplicate/Mirror/Flip
Highlight your blank canvas.
New Raster layer.
Select All.
Copy and paste Paper 13 Into Selection.
Deselect.
Apply the mask.
Use your Pick Tool to pull the top down a little and the right side out.
Merge Group.
Add your credits.
Add your name:
Color Pallet:
Foreground: #ae9c79
Background: #7a3332
Stroke: 1
Type your name.
Give it a slght Inner Bevel:

I hope you enjoyed this tutorial as much as I did creating it for you.
I'd really love to see your results.
Email me!
Hugs,
Bev
No comments:
Post a Comment